Beyond 100 Megabits Per Second
02 Mar 2024 hardware · internet · technologyAfter moving to a new apartment recently, I made a contract with an ISP offering a best effort 1 Gigabit connection. At both apartments I lived in previously in Japan, an Internet connection was bundled with the rental agreement. As these connections had a maximum bandwidth of 100 Megabit, I never looked at my peripherals to see whether they were capable of Gigabit. When I bought a computer, I noticed (without much interest) that the computer’s motherboard was capable of Gigabit ethernet. When I checked my Internet speed with a Gigabit connection, I noticed that it was only about 93 Mbps. This post is the story of understanding my home network, the various bottlenecks along the way, and finally, going beyond 100 Mbps.
Internet in Japan
Before we delve into the exact setup and the various problems that I encountered during my setup, it will be worthwhile to explain the way broadband Internet connections work in Japan. In any Internet connection setup, there are two parts to the connection: The first part is the Access network which consists of all the wires which go from each subscriber’s home to the “Edge router” of the Internet service provider (ISP). The second part is the ISP’s own network, which peers with Internet exchanges, public and private peers to provide full route transit to users. In Japan, these two parts of the Internet connection are owned and administered by two different entities.
The access network is more-or-less completely owned by Nippon Telegraph and Telephone company (NTT), one-third of which is owned by the Japanese government. Japan’s constitution has special laws regarding NTT, which started as a state monopoly, but was later privatized in 1985. Recently, other companies such as KDDI have also started laying their own cables to users’ homes. However, NTT still provides the widest coverage across the country, through their product, known technically as the “Next Generation Network (NGN)” with the brand name “FLETS”.1 The NGN is able to provide upto 10 Gbps of bandwidth to individual home Internet users.
This separation of the access network and the ISP networks is unusual. It is the main reason for the large number of internet service providers for broadband Internet in Japan. The market is extremely competitive and there are perennial discount campaigns which are run by companies to get users to switch companies. As the access network itself remains unchanged no matter which ISP you sign up with, switching to a different ISP is as simple as signing up for a service online, receiving PPPoE username/password information via e-mail, and reconfiguring your router on the appropriate day and connecting to your new ISP.
However, this ease of shifting companies also means that predatory practices among ISPs are common. The most notorious of these being the “contract termination” fees. Several popular ISPs have fixed term contracts, which run for 2 or 3 years. If a contract is terminated during this period, users are charged the contract termination fee. (Interestingly, there are discount campaigns in which the new ISP will refund the user the contract termination fee that was charged by their previous ISP.)
In technical terms, this separation means that the equipment used to connect to the access network is the same, irrespective of the ISP that you choose to use. It is a small black box, called the “Optical Network Unit (ONU)”:

The ONU has 1 port where one can connect a Fiber optic cable, which connects to the closest telephone poll, managed by NTT and connecting the ONU to the access network. On the other side, it has a RJ-45 Ethernet port which can be connected to the WAN port of your home network’s router.
Another peculiar technology which is (probably) only used in Japan for home Internet access is IP over Ethernet (IPoE). IPoE is a technology which I could not find much documentation about at all. Several ISPs in Japan have recently started offering IPoE in order to connect to the IPv6 internet. There are also IPv6 to IPv4 translation services, which are integrated directly with the ISPs, and allow users to use IPv4 websites from their homes (even though they do not have an IPv4 global IP address). I have not used this because my router does not support IPoE. However, the Linux kernel has native support for IPoE, which means that if I connect my computer directly to the Ethernet port on the ONU, I can use IPoE to connect to the Internet, without installing anything or having to configure a username and password. I have no idea how this works without authentication. The documentation that I was able to find suggests that the user’s location is inferred based on the physical cable which they use to connect to the ISP.
The primary method for connecting to the IPv4 internet is the age-old Point-to-Point Protocol over Ethernet (PPPoE), which can be configured using a username and password issued by the ISP. (IPoE bypasses the authentication step, which removes the user’s dependence on the PPPoE authentication server, which is apparently a common cause for slowdown during periods of congestion.)
Home Network
The rooms where I had set up the ONU and the one in which I wanted to use a wired connection were different, and quite far apart. Fortunately, the whole house was wired with Cat 5E Ethernet cables. This cable is capable of Gigabit speeds.
The rough schematic looks like this:
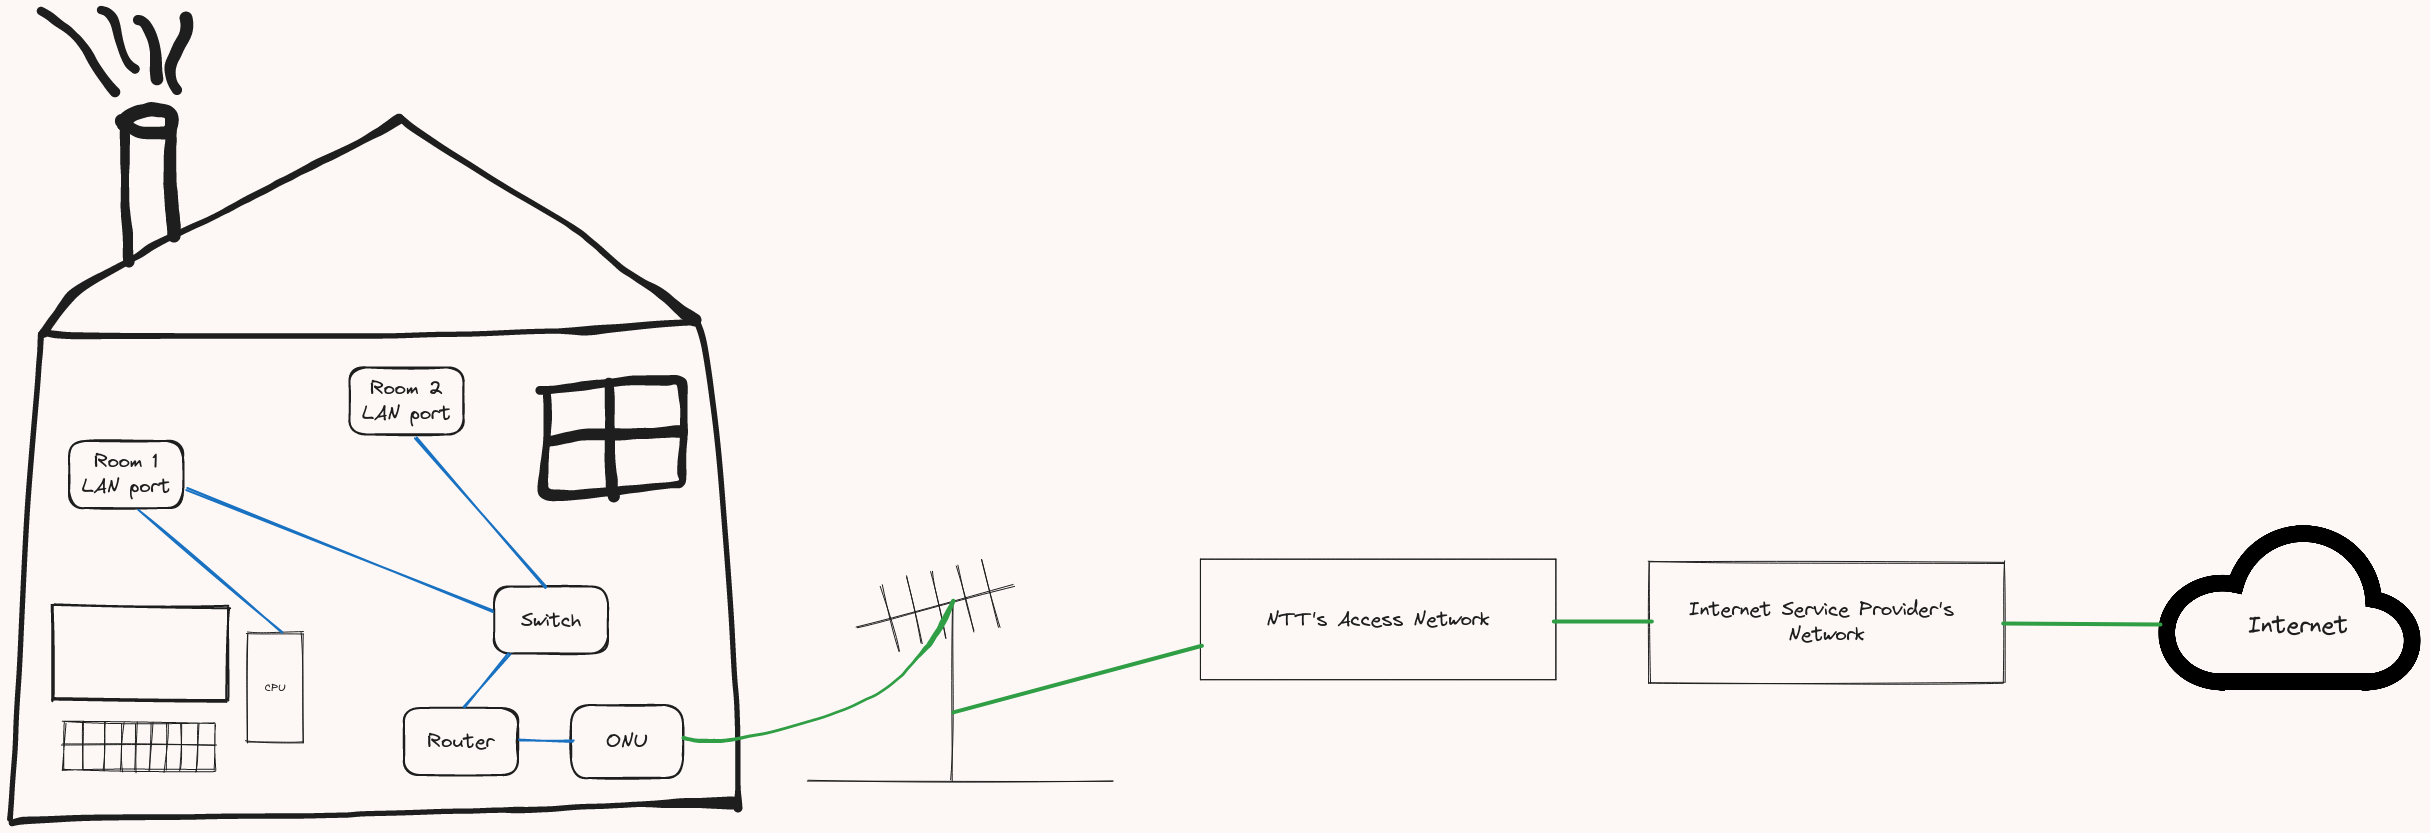
Each room was connected, by wires running through the walls and the floor, to a closet in the living room. On the top shelf of this closet, was a wall-mounted Network switch, which can be used in addition to a router, to provide wired connections in each room in the apartment.
A switch is a networking device which sits inside a network and increases the number of ports on a router. While a router sits between networks (my home network and the ISP’s network), a switch sits within a network and increases the number of computers that can connect to the network. A typical router has a single WAN (Wide-Area Network) port and multiple LAN (Local Area Network) ports. By connecting one of these LAN ports to a single port on the switch, any computer connected to any of the other ports of the switch will join the same network that is being managed by the router. Switches operate at Layer 2 (data link layer) and do not know about IP addresses. They only know about MAC addresses and send traffic to the appropriate destination based on the information that is contained in each packet.
The router that I am using is old. However, it is capable of Gigabit speeds. So, from the ISP until the router in my house, Gigabit speeds were possible.
Problems
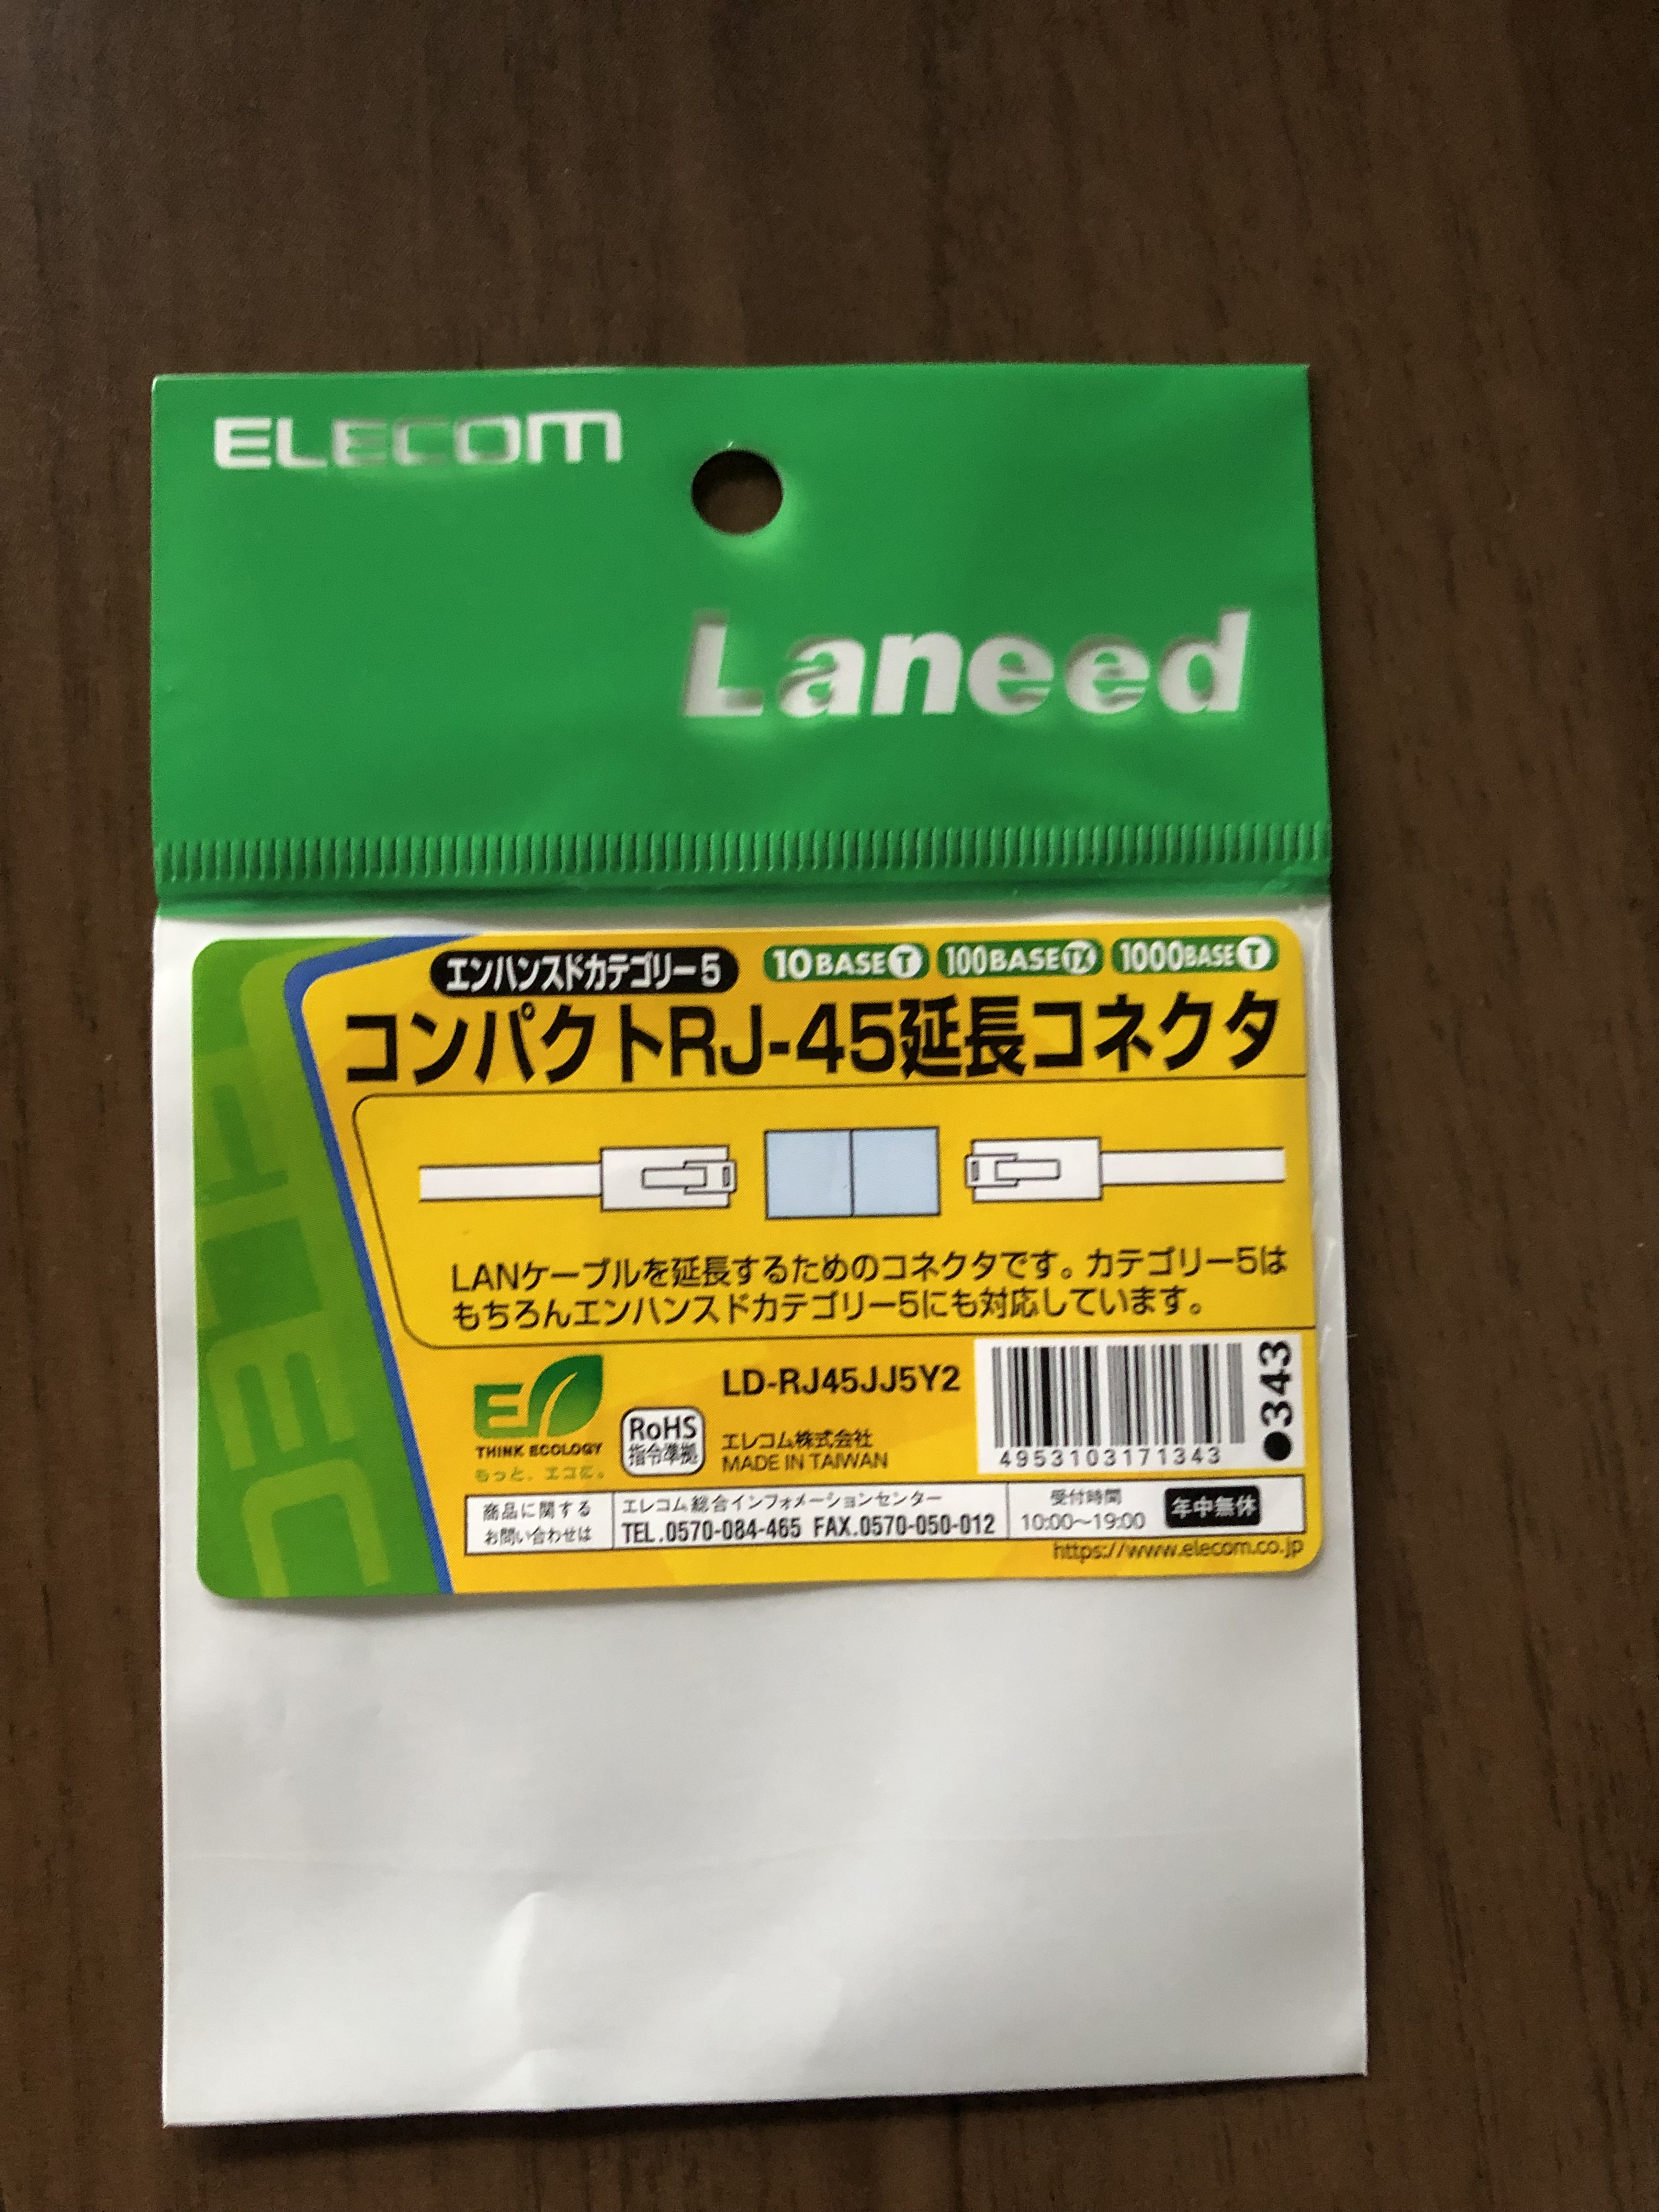
The first problem I faced was with the switch that was installed in the house. It was a very old 100 Megabit 8-port switch (like this one). I did not really need the 8 ports in the switch because I was planning to use a wired connection in only one room. So, I wanted to connect the LAN cable which ran from that room to the top shelf of the closet directly to my router. However, this was not possible because the cables were wired tightly, with no “play” in them to allow extension outside the socket that was connected to the switch. So, I bought an RJ45 cable extender, which can be used to provide metallic contacts and connect two Ethernet cables head to head:
The other problem I faced was that almost all the peripheral devices that I had were devices which only supported 100 Megabit. This included a Raspberry Pi, which I am using as a local DNS server, an old laptop, which has a 100M Ethernet port, and a USB-A to Ethernet adapter, which was only USB-A 2.0. This problem was resolved after I bought a USB-A 3.0 to Ethernet adapter, which did not require any drivers to work.2
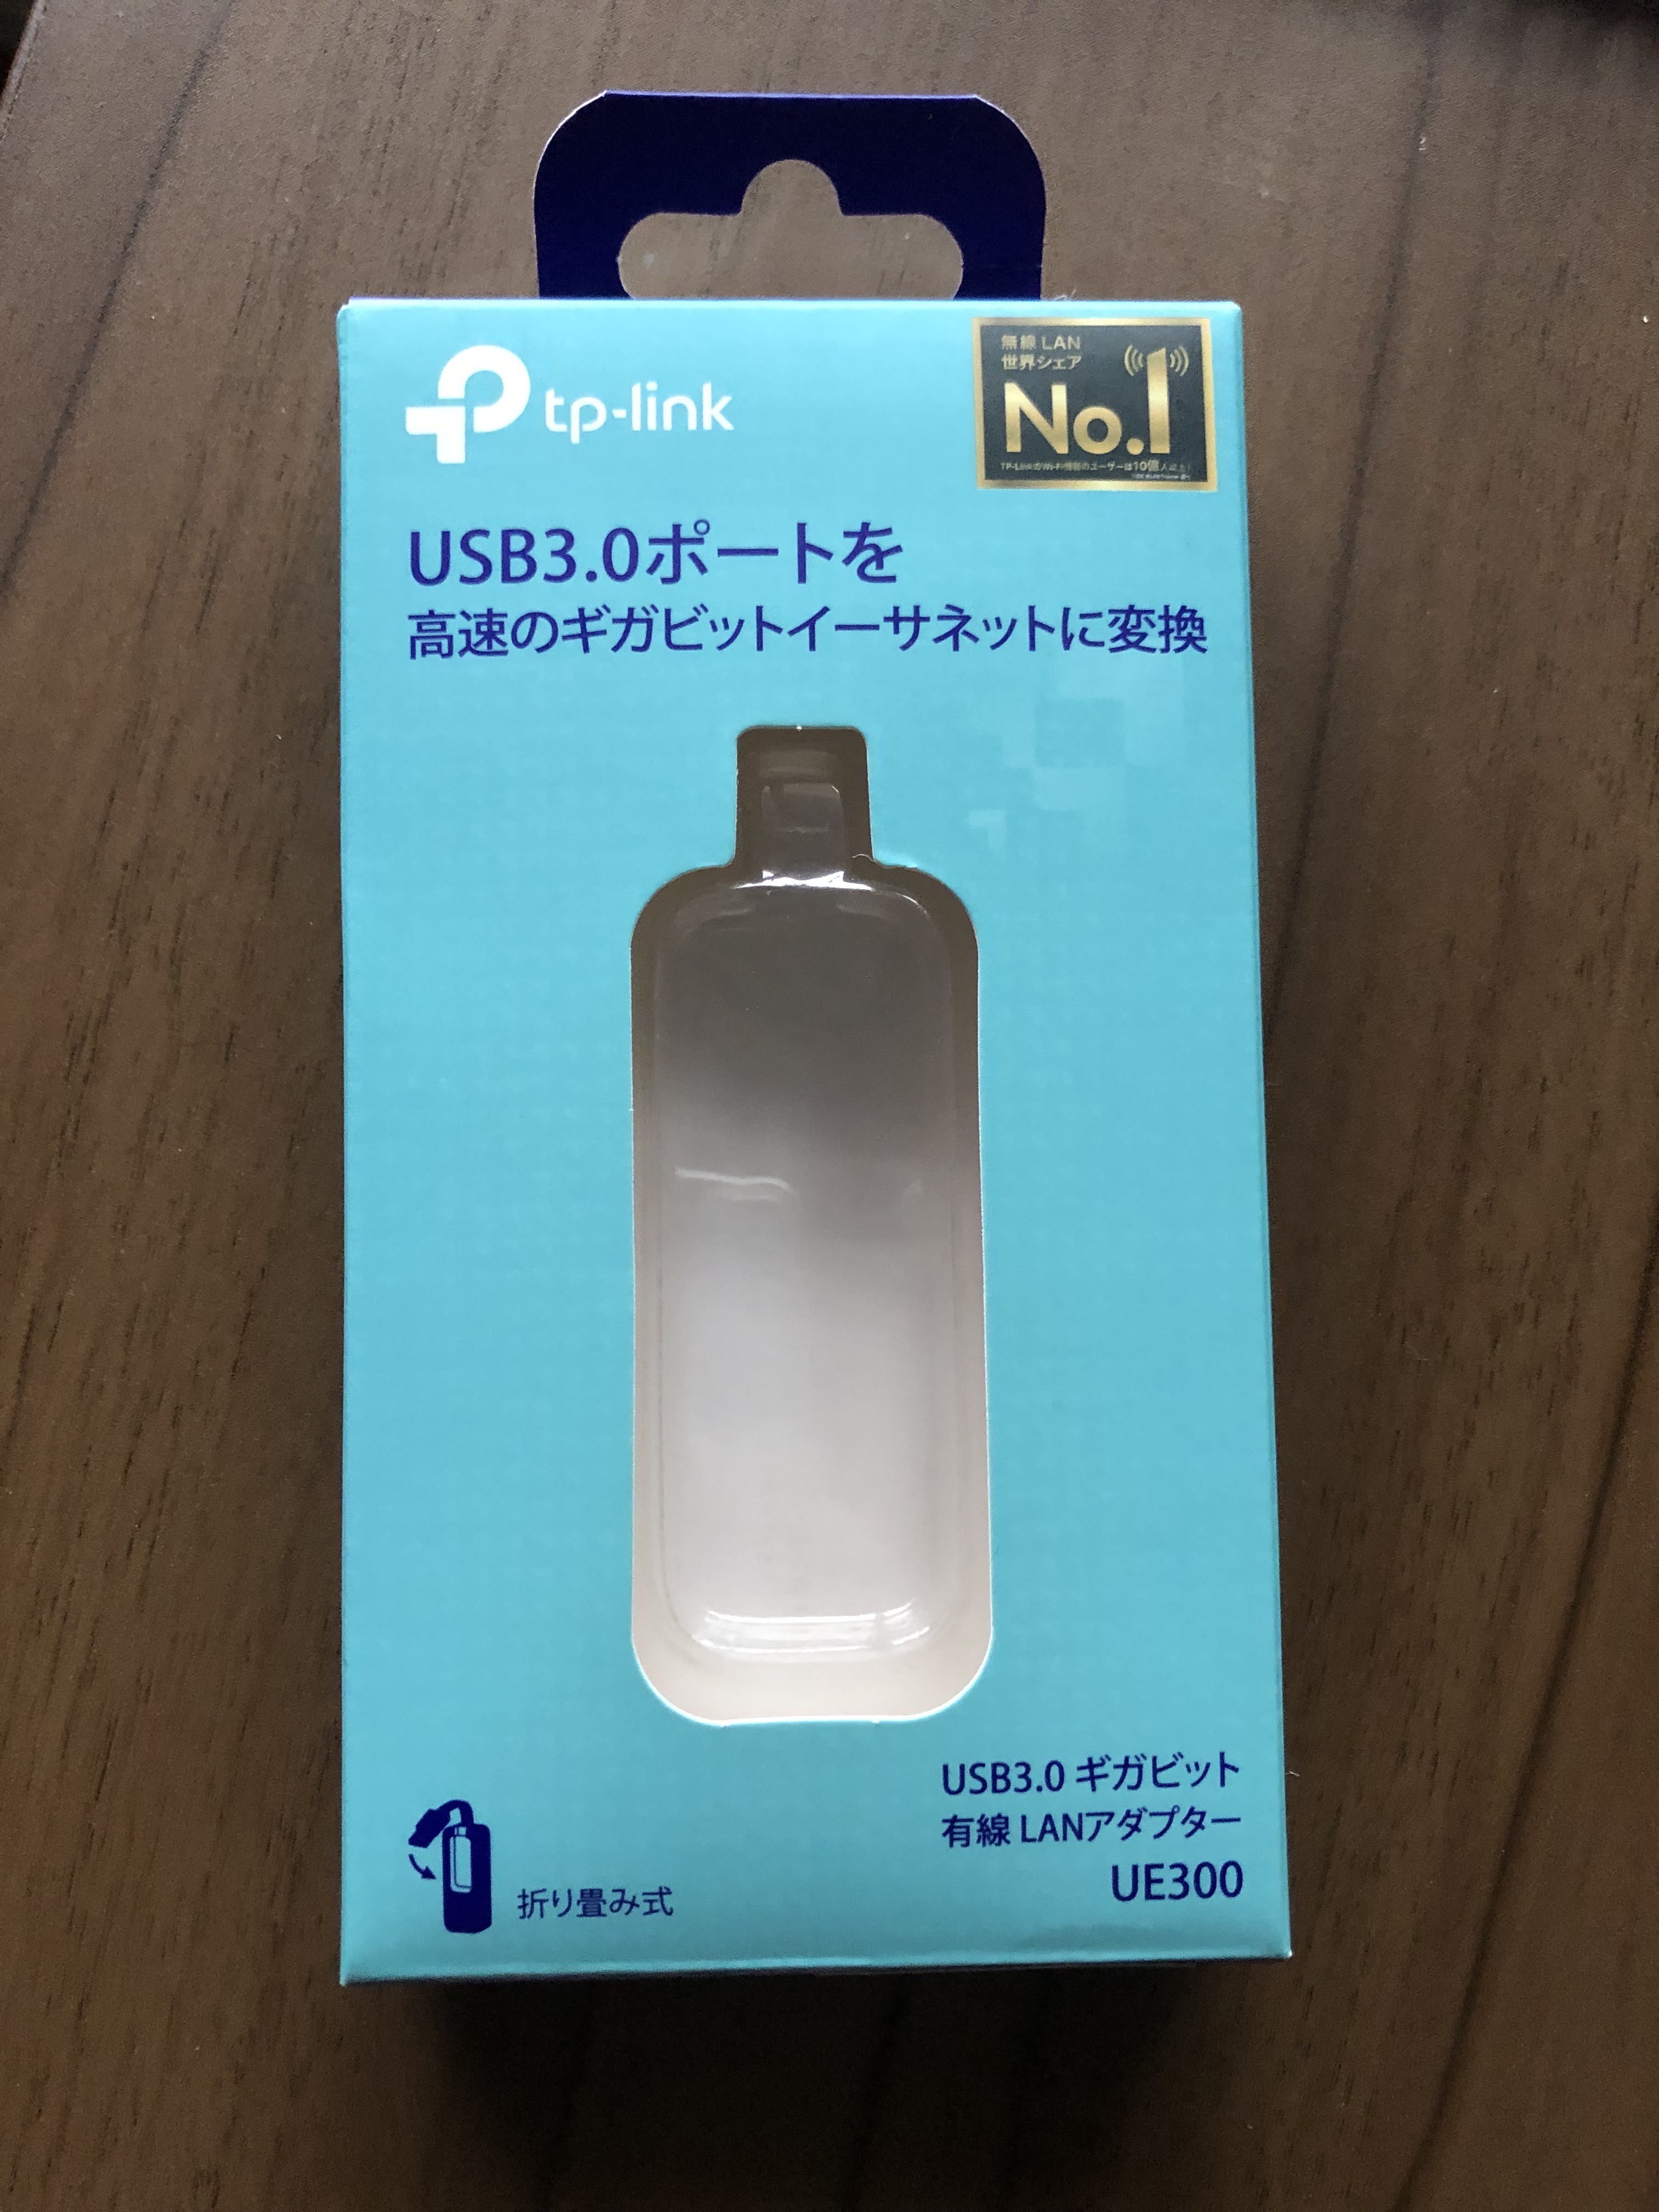
Note: I do not recommend this product as the USB to LAN adapter of choice. It is the TP-Link UE300 1Gigabet Ethernet to USB-A adapter. However, it uses the Realtek RTL8153 IC chip inside it and this chip appears to be unreliable and after just a few days of use, the adapter stopped working properly. It would start in the “connected” state with the LED light flickering, indicating that it was working properly. But soon after that, the LED light would stop flickering and the LAN connection would no longer be recognized by the OS. This problem with the RTL8153 IC chip seems to be common and a reason for the unusability of many Ethernet adapters and USB-C hubs as well.
Finally, I was able to get speeds higher than 100 Mbps on a wired connection:
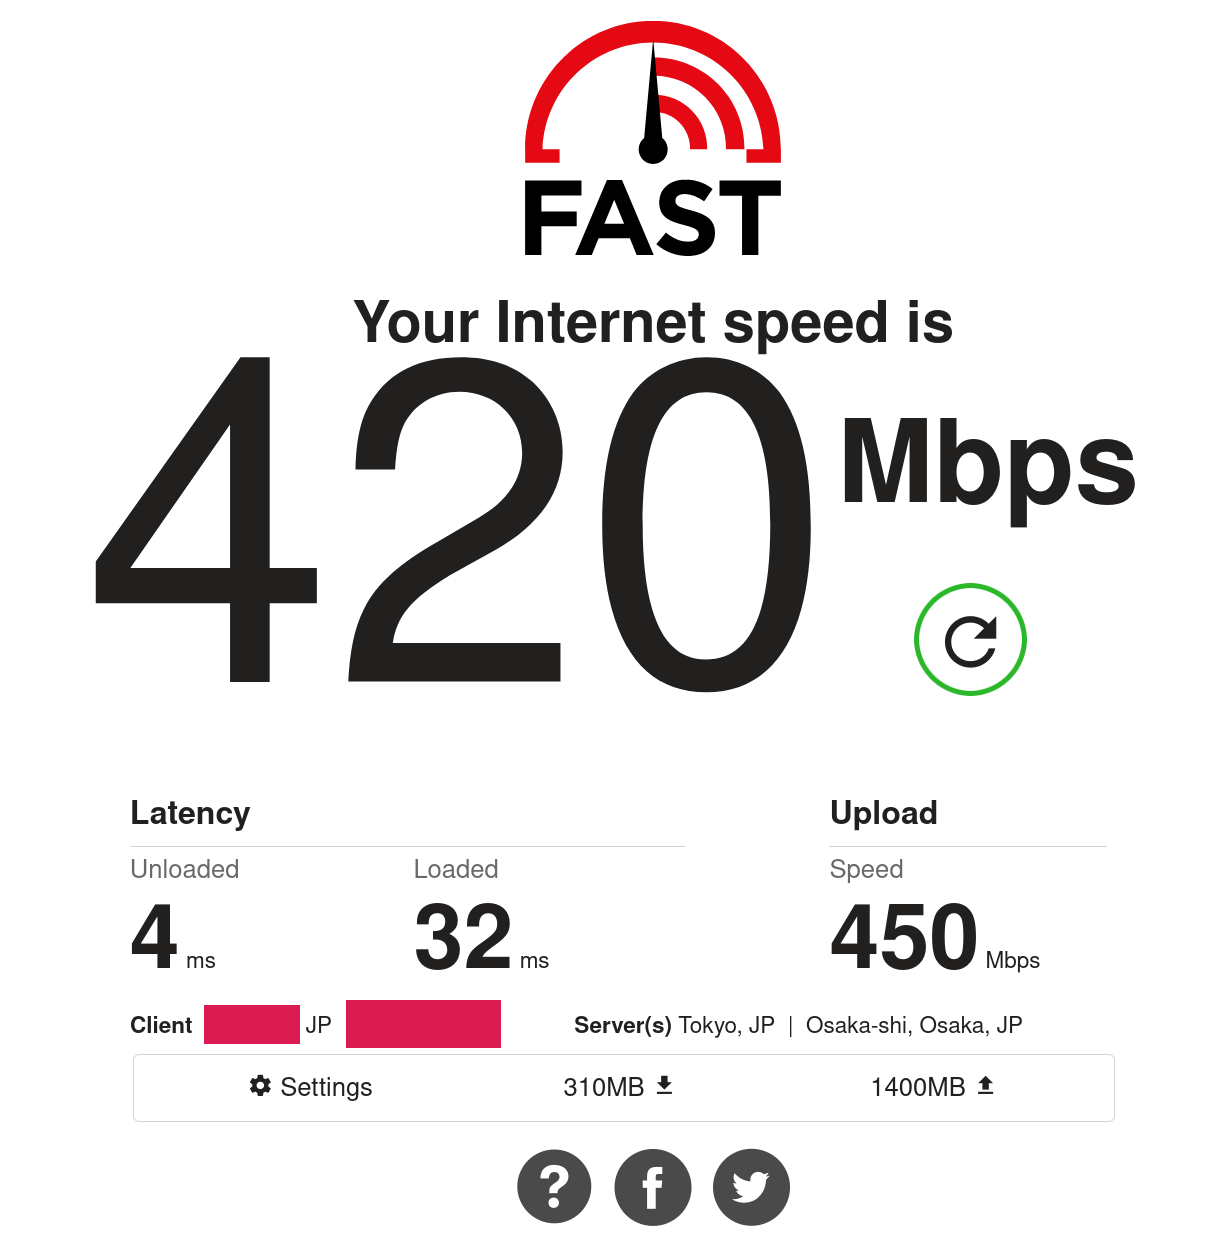
I tested this setup on Windows, Mac, and Linux, at various times of the day. And the speed were quite good, ranging from 250 Mbps to 400 Mbps. Upload speeds were even better than download speeds, maxing out at about 500 Mbps. (I don’t upload anything at all, so this part of the symmetric connection is mostly unused in my use-case.)
Conclusion
This was a run-of-the-mill setup post. Practically speaking, the difference between 80 Mbps and 250 Mbps is not particularly remarkable; I took this more as a game to get to a setup with faster “theoretical” speeds. Along the way, I learned about the various USB versions and their incredibly confusing names; information that was useful to me during future setups, where I had to choose the right USB versions for the other peripherals. One of the other interesting rabbitholes that I went down while doing this setup was the nature of USB-C and why it is reversible and how it can do so much, and will probably be widely adopted.
(I have not talked much about WiFi here. Basically, my router is capable only of WiFi 5, which is capable of more than 100 Mbps theoretically. However, the latency of wireless connections is generally high, and the Intel wireless chip that is in the motherboard of my Thinkpad laptop has typical roundtrip times as high as 100 milliseconds. Speeds vary wildly depending on the number of other devices and the type of data that they are using. So, I am glad that I have a good wired connection.)