Adventures with Wireguard and MTU
31 Aug 2024 internet · linux · networkingThis past weekend, I wanted to set up Miniflux, a browser-based RSS1 reader. I have been using it locally for the past two weeks and it has been extremely worthwhile. It has the dual advantage of always being online and the ability to categorize feeds, which helps me group the feeds that I want to read (blogs) from those that I want to skim (news). I did not want to set up a Miniflux instance which would have ports open to the Internet. I wanted the instance to be available only inside a private network; I wanted to use Wireguard to set up the private network. I ran into a problem that looks extremely simple in hindsight: The packets which were being sent on the Wireguard interface were larger than the Max Transmission Unit of some router between the VPS2 and my laptop. This is something that I have not run into before. It was interesting to delve through the various layers of Linux’ networking stack. What follows is an account of my investigation.
The initial set up was very easy to get up and running.
First, create a Wireguard network with 3 peers: the VPS, my laptop, and my phone. Inside the
Wireguard tunnel, the VPS was at 192.168.1.1 and my laptop was at 192.168.1.2. ping
192.168.1.1 on my laptop yielded the correct result; 64 byte ICMP3 packets were being
exchanged between the two ends of the tunnel.
$ ping -c 2 192.168.1.1
PING 192.168.1.1 (192.168.1.1) 56(84) bytes of data.
64 bytes from 192.168.1.1: icmp_seq=1 ttl=64 time=19.4 ms
64 bytes from 192.168.1.1: icmp_seq=2 ttl=64 time=6.22 ms

--- 192.168.1.1 ping statistics ---
2 packets transmitted, 2 received, 0% packet loss, time 1002ms
rtt min/avg/max/mdev = 6.215/12.810/19.406/6.595 ms
Next, start Miniflux using a docker container: The Docker container was listening on the host port
10443 (i.e. 127.0.0.1:10443). Locally, from the VPS itself, requests to the Miniflux endpoints
/ (which loads the login page) and /version (which prints the semantic version of the running
Miniflux) worked well. (The running database container has a port but this port is not exposed to
the host network.)
$ docker ps --format "{{ .Image }}\t{{ .Ports }}" | column -t
miniflux/miniflux:latest  127.0.0.1:10443->8080/tcp
postgres:15               5432/tcp
Finally, install and configure Nginx on the VPS. A single site was enabled with the following configuration:
server {
    listen 192.168.1.1:80 default_server;

    charset utf-8;
    location /healthz {
        return 200;
    }

    location / {
        proxy_pass http://127.0.0.1:10443;
    }
}
After restarting the nginx.service Systemd unit, I expected curl http://192.168.1.1/healthz to
return an empty response with HTTP 200 status code. This worked. The request was logged in the Nginx
access log. I tried curl http://192.168.1.1/. Here, the problem begins to make itself known: The
request reaches Nginx and is logged in the Nginx access log. The request also reaches inside the
Miniflux container4. However, no response is returned to Curl. In fact, Curl just keeps waiting
forever. The request is handled in a few milliseconds according to Miniflux.
This alone was not too distressing. It indicates that Nginx’ proxy_pass directive is not
working. I don’t expect these kind of things to start working immediately because there is always
some minor misconfiguration, which can only be found in a second pass over the system. Also, there
were many parts of the setup that I had not even thought about at this point: firewall rules on my
laptop; firewall rules on the VPS; (perhaps) the hosting provider has a separate set of firewall
rules for outbound traffic (similar to GCP?); (perhaps) my router is not set up to accept incoming
TCP or UDP packets. I would have cycled through these theories … had it not been for this:
$ curl http://192.168.1.1/version
2.2.0
Requests to the /version endpoint on the same server along the identical network path worked;
the response was coming from Miniflux.
One more confounding variable: Another member in this Wireguard mesh network was a smart phone. I
attempted to load http://192.168.1.1/ from that device in Firefox, and the page loaded! It showed
the appropriate login page that I was expecting to see.
Tethering this phone to my laptop using a USB cable and turning off WiFi, I noticed that on the 4G network of my phone too, the login page worked. Here is a matrix of what worked and what did not:
| Device | Network | /version works? |
Login page works? |
|---|---|---|---|
| Laptop | Home WiFi | Yes | No |
| Laptop | Cellular | Yes | Yes |
| iPhone | Home WiFi | Yes | Yes |
| iPhone | Cellular | Yes | Yes |
So, what was going on here precisely? This was going to be something either very interesting and specific to my setup, or something fairly silly, such as a misconfiguration somewhere. Nevertheless, I was in for the long haul: A completely broken system is easier to fix than a partially broken one.
iptables
I have tried my best to stay away from the actual implementation and usage of iptables. I know about iptables and their usual use cases. I can even get away with reading rules, such as this implementation of a reverse proxy using only iptables (courtesy: GCP):
iptables -t nat -A PREROUTING -p tcp -m tcp --dport $DB_PORT -j DNAT --to-destination $DB_ADDR:$DB_PORT
iptables -t nat -A POSTROUTING -j SNAT --to-source $LOCAL_IP_ADDR
I don’t think I need to explain the above. It is pretty intuitive.5 iptables is a core feature of the Linux Kernel, but there are some quirks in using it “properly.” Most of the quirks can be demonstrated using the following diagram, taken from the Wikipedia page on iptables:
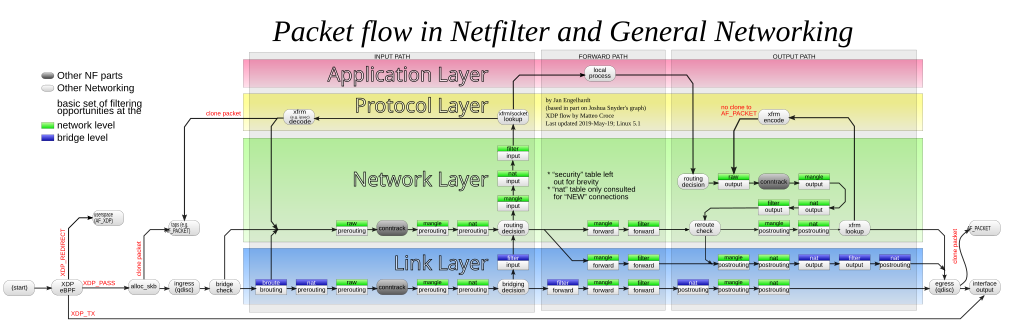
Is the text too small to read? You’re getting the point now!
Jokes apart, the design of netfilter and the frontend to netfilter, iptables, is pretty good (I have
heard.) It makes everything possible: you can “mangle” packets, update where they come from, update
where they go, prevent packets from entering the system, … and so on. All of it happens inside the
kernel. Generally, I avoid iptables and use the simpler wrapper ufw (Universal Firewall). ufw
adds rules to the filter table’s INPUT chain. By the way, ufw alone is not good enough if you
are using Docker. See this well-known flaw when the two are used together, which is introduced due
to the rules that are added to iptables when Docker is installed.
In this case, I had added only the default ufw rules, which deny all incoming and routed traffic,
and allow all outgoing traffic. To take this out of the equation, I disabled UFW completely. UFW
outputs logs whenever it blocks packets and these can be seen in the output of dmesg -wT. The
packets that were supposed to make their way back from the VPS to my laptop were not showing up
here. Interestingly, in the few minutes that the VPS did not have any firewall enabled, I saw
several logs to Nginx from masscan and ivre-masscan. These tools are scraping the whole Internet in
about 5 minutes: That is very cool. I have used only nmap for amateur port scanning (mostly to
see whether sshd is actually listening on some port) and netcat to check for things like MySQL
servers and SSH servers, both of which will write their version and the authentication plugin that
they are using if you open a netcat connection with them.
Docker
Oh, right. Docker starts virtual bridge networks which are separate from the host
network, but are connected together through the 172.17/16 subnet. The device docker0 takes
every packet that is bound for this subnet by adding a route to ip route, and presumably,
redirects the packet to the right container.
All of this is fairly good. I did not have many doubts here. The requests were clearly going through
Docker and reaching the container inside it. I started the httpd container; and … it worked.
# On the VPS
$ docker run -d --name httpd -p 8080:80 httpd:alpine
88d95f2bce5bae6edbfde87ac4e57295038689790bf37cd26e65ddc04b9f79f7

# On my laptop
$ curl http://192.168.1.1:8080
<html><body><h1>It works!</h1></body></html>
Once again, the small response sent by httpd worked well, whereas the login page was still not
working.
To completely avoid having to deal with Docker, I downloaded the static binary of miniflux from
GitHub and ran it locally. Once again, local requests to the login page worked, while remote
requests to /version did not work. I was stuck with the same problem even without Docker.
ufw
As I said, I did not want ports to be open on the VPS because there are large programs that are
scanning all of the Internet a few hundred times each day. So, I had enabled ufw allowing only
incoming UDP traffic on one port for Wireguard and incoming TCP traffic on another port for SSH. I
did not expect these rules to be causing problems, and they were apparently not.
Completely disabling UFW did not make any difference at all.
Note: One quirk of UFW is the file /etc/ufw/after.rules. When UFW is disabled, the iptables
which are added by ufw are removed. The rules which are added to iptables from the after.rules
are not reverted. I guess this is because UFW does not know how to revert these rules.
$ sudo ufw disable
Firewall stopped and disabled on system startup

$ sudo iptables -S ufw-logging-deny
iptables v1.8.7 (nf_tables): chain `ufw-logging-deny' in table `filter' is incompatible, use 'nft' tool.

$ sudo ufw enable
Firewall is active and enabled on system startup

$ sudo iptables -S ufw-logging-deny
-N ufw-logging-deny
-A ufw-logging-deny -m conntrack --ctstate INVALID -m limit --limit 3/min --limit-burst 10 -j RETURN
-A ufw-logging-deny -m limit --limit 3/min --limit-burst 10 -j LOG --log-prefix "[UFW BLOCK] "
tcpdump
I had reached the point where I would have to resort to using tcpdump. tcpdump is a great tool
for debugging network problems. I have used it a few times when working with Istio.6
With tcpdump, the toughest part is to get to the really useful packet dumps. For this, I began
with the requests that worked: I chose the very simple /robots.txt response from Miniflux.
$ curl -vvv http://192.168.1.1/robots.txt
> GET /robots.txt HTTP/1.1
> User-Agent: curl/7.74.0
> Accept: */*
[snip]
< HTTP/1.1 200 OK
< Server: nginx/1.26.2
< Date: Thu, 29 Aug 2024 05:59:25 GMT
< Content-Type: text/plain; charset=utf-8
< Content-Length: 25
< Connection: keep-alive
<
User-agent: *
Disallow: /%
The TCP dump output on both sides of the tunnel was identical. It looked like this:
(vps) $ tcpdump -n 'port 50000'
[snip]
13:10:47.533724 IP vps.43448 > laptop.50000: UDP, length 96
13:10:47.533856 IP laptop.50000 > vps.43448: UDP, length 96
13:10:47.541738 IP vps.43448 > laptop.50000: UDP, length 96
13:10:47.541923 IP vps.43448 > laptop.50000: UDP, length 176
13:10:47.541966 IP laptop.50000 > vps.43448: UDP, length 96
13:10:47.543038 IP laptop.50000 > vps.43448: UDP, length 272
13:10:47.548850 IP vps.43448 > laptop.50000: UDP, length 96
13:10:47.548850 IP vps.43448 > laptop.50000: UDP, length 96
13:10:47.548923 IP laptop.50000 > vps.43448: UDP, length 96
13:10:47.554451 IP vps.43448 > laptop.50000: UDP, length 96
This is fairly boring. The only thing to notice here is that the length of all of these UDP packets sent by Wireguard is very small. (This fact was not remarkable to me during the investigation.)
Next, the request that fails. GET /
13:10:54.636017 IP vps.43448 > laptop.50000: UDP, length 96
13:10:54.636139 IP laptop.50000 > vps.43448: UDP, length 96
13:10:54.641641 IP vps.43448 > laptop.50000: UDP, length 96
13:10:54.641641 IP vps.43448 > laptop.50000: UDP, length 176
13:10:54.641707 IP laptop.50000 > vps.43448: UDP, length 96
13:10:54.644767 IP laptop.50000 > vps.43448: UDP, length 1452
13:10:54.644779 IP laptop.50000 > vps.43448: UDP, length 1452
13:10:54.644781 IP laptop.50000 > vps.43448: UDP, length 1452
13:10:54.644783 IP laptop.50000 > vps.43448: UDP, length 160
13:10:54.645059 IP laptop.50000 > vps.43448: UDP, length 1452
13:10:54.645069 IP laptop.50000 > vps.43448: UDP, length 1452
13:10:54.645198 IP laptop.50000 > vps.43448: UDP, length 864
13:10:54.650279 IP vps.43448 > laptop.50000: UDP, length 96
13:10:54.650279 IP vps.43448 > laptop.50000: UDP, length 112
13:10:54.657194 IP laptop.50000 > vps.43448: UDP, length 1452
13:10:54.657203 IP laptop.50000 > vps.43448: UDP, length 1452
13:10:54.657206 IP laptop.50000 > vps.43448: UDP, length 1452
13:10:54.657445 IP laptop.50000 > vps.43448: UDP, length 1452
13:10:54.657450 IP laptop.50000 > vps.43448: UDP, length 1452
13:10:54.869238 IP laptop.50000 > vps.43448: UDP, length 1452
13:10:55.317282 IP laptop.50000 > vps.43448: UDP, length 1452
13:10:56.181234 IP laptop.50000 > vps.43448: UDP, length 1452
13:10:57.877260 IP laptop.50000 > vps.43448: UDP, length 1452
13:11:00.840330 IP vps.44215 > laptop.50000: UDP, length 96
13:11:00.840525 IP laptop.50000 > vps.44215: UDP, length 96
13:11:00.848374 IP vps.44215 > laptop.50000: UDP, length 96
Immediately, I noticed that these length 1452 packets were the ones which were not making it to
the laptop. As I was running tcpdump on both sides, I could see that the smaller packets of
various sizes (112, 96, 864) were making it through perfectly fine and in the same order. However,
the largest of these packets, of size 1452 bytes, were not making it through.
I continued running the same tcpdump command and now checked the request GET / on my iPhone with
the WiFi network:
13:10:30.755011 IP vps.44215 > iphone.50000: UDP, length 592
13:10:30.755320 IP vps.44215 > iphone.50000: UDP, length 148
13:10:30.755660 IP iphone.50000 > vps.44215: UDP, length 92
13:10:30.763983 IP vps.44215 > iphone.50000: UDP, length 32
13:10:30.767831 IP iphone.50000 > vps.44215: UDP, length 1312
13:10:30.767844 IP iphone.50000 > vps.44215: UDP, length 1312
13:10:30.767847 IP iphone.50000 > vps.44215: UDP, length 112
13:10:30.767950 IP iphone.50000 > vps.44215: UDP, length 96
13:10:30.778499 IP vps.44215 > iphone.50000: UDP, length 96
13:10:30.809367 IP vps.44215 > iphone.50000: UDP, length 480
13:10:30.811026 IP iphone.50000 > vps.44215: UDP, length 1168
13:10:30.820942 IP vps.44215 > iphone.50000: UDP, length 96
Here, things got interesting, Despite being on the same network, the VPS was sending the iPhone smaller packets of 1312 bytes. At this point, I pretty much knew that something was off about these large packets and some thing was dropping them in the middle. I still did not know what or why though. Before we get there, a small detour through one of the other theories I had during my investigation.
Other theories
My home network is a broadband Internet connection, which uses IPoE (Internet Protocol over Ethernet). This is an improvement over PPPoE7 with the primary merit being that there is no PPPoE authentication server when sending packets outside. Packets are sent directly to the ISP’s router which is closest to my home. Packets are authenticated implicitly: The very fact that I am able to send packets to the ISP routers at a given port implies that I must be a subscriber of their service. It works remarkably well; with download speeds increasing at least 2X from not having to go to the authentication server repeatedly. IPoE is not very well documented (at least from what I could tell.) The only documentation I could find was an old PDF written by Juniper Networks.
Also, my ISP is also only capable of IPv6 over IPoE. They partner with another company, which provides IPv4 over IPv6 transfer. This is powered by the Dual-Stack Lite (DS-Lite) protocol. I don’t know much about these protocols except for a basic idea about what they are supposed to do. One of the disadvantages of using IPoE is that there is no static IP support anymore: I am on a local network which is managed by my ISP and all packets go through this partner before reaching the requested IPv4 destination. All of these things sounded suspicious; were hard to understand; and sounded very much like the root cause of my woes.
The main difference between IPv6 and IPv4 is the size of the header: 40 bytes vs. 20 bytes. If I want to send an IPv4 packet inside an IPv6 packet, the header size would now be 60 bytes per packet, I reasoned. So, the actual data that can be transmitted over IPv4 over IPv6 networks would be 40 bytes less than what Wireguard thought it should be.8 The packet size which was not transmitted (1452) and the one that was (1312) seemed to point in this direction.
Answer: Max Transmission Unit
Finally, I landed on MTU and started thinking about it. The only other context in which I had heard about MTU was that of WiFi networks. Changing the MTU of a WiFi network is supposed to make things faster by increasing packet sizes, and reducing the number of roundtrips on the high latency WiFi connection between a device and the router.
My router’s settings page told me that the MTU which was configured for the home network was 1500. The MTU which had been negotiated with my ISP was 1454. This number was uncomfortably close to the size of the packets which were being dropped. I looked around for more information about MTU and landed on the precise problem that I was facing: MTU blackholing. The server was attempting to send a packet that was too big for some link along the way. Whichever router rejects the packet, sends a special ICMP message back to the VPS, telling it that the packet size is too big, and that the data should be broken up into multiple packets. However, the VPS is either not listening for these ICMP packets or blocking them or something else: It does not act appropriately and reduce the packet size. Instead, it just keeps retrying the same packet until the underlying TCP connection eventually gives up, assuming that the destination is not listening anymore.
The solution was to specify MTU = 1400 in the [Interface] sections of the wg-quick
configurations on both the VPS and my laptop. After restarting the Wireguard interfaces, I was able
to confirm that the solution worked by requesting http://192.168.1.1/ using Curl and a
browser. The TCP dump output was interesting too:
06:30:35.332857 IP vps.38130 > laptop.50000: UDP, length 32
06:30:36.054528 IP vps.38130 > laptop.50000: UDP, length 96
06:30:36.054726 IP laptop.50000 > vps.38130: UDP, length 96
06:30:36.060136 IP vps.38130 > laptop.50000: UDP, length 96
06:30:36.072759 IP vps.38130 > laptop.50000: UDP, length 608
06:30:36.072832 IP laptop.50000 > vps.38130: UDP, length 96
06:30:36.073642 IP laptop.50000 > vps.38130: UDP, length 1432
06:30:36.073653 IP laptop.50000 > vps.38130: UDP, length 1168
06:30:36.078799 IP vps.38130 > laptop.50000: UDP, length 96
06:30:36.078799 IP vps.38130 > laptop.50000: UDP, length 96
06:30:36.081931 IP vps.38130 > laptop.50000: UDP, length 176
06:30:36.081932 IP vps.38130 > laptop.50000: UDP, length 208
06:30:36.082073 IP laptop.50000 > vps.38130: UDP, length 96
06:30:36.082292 IP laptop.50000 > vps.38130: UDP, length 176
06:30:36.082369 IP laptop.50000 > vps.38130: UDP, length 176
06:30:36.083529 IP laptop.50000 > vps.38130: UDP, length 304
06:30:36.088139 IP vps.38130 > laptop.50000: UDP, length 96
06:30:36.088729 IP vps.38130 > laptop.50000: UDP, length 112
06:30:36.088859 IP laptop.50000 > vps.38130: UDP, length 96
06:30:36.089944 IP vps.38130 > laptop.50000: UDP, length 96
06:30:36.089975 IP laptop.50000 > vps.38130: UDP, length 96
06:30:36.094581 IP vps.38130 > laptop.50000: UDP, length 96
The largest packet which was transmitted was 1432 bytes, despite the Wireguard link’s MTU being set to 1400. The 32 byte difference is probably because of the 16 byte header for Wireguard packets and the 16 byte authentication tag at the end of the UDP packet:
- 20-byte IPv4 header or 40 byte IPv6 header
- 8-byte UDP header
- 4-byte type
- 4-byte key index
- 8-byte nonce
- N-byte encrypted data
- 16-byte authentication tag
Without the MTU = 1400 setting, I ran tracepath --mtu 192.168.1.1 and found that the MTU
detected by Wireguard
was 1420. I have a sneaking, unconfirmed suspicion that this is because of IPv4 over
IPv6, and its additional overhead of 40 bytes per packet. The numbers don’t completely add up: 1420
does not work, 1400 works, but the overhead of using IPv4 over IPv6 is 40 bytes (Right?)
So, my plan to confirm this is to set up a VPS which has IPv6 connectivity and use the VPS’ public IPv6 address and check whether the automatically detected MTU works in that case.
One point of proof that I have for this theory is another Wireguard network that has a VPS with IPv6 connectivity. When using the VPS’ IPv6 public IP address, I can confirm that the MTU of 1420 works properly in that case:
$ traceroute --mtu 192.168.1.1
traceroute to 192.168.1.1 (192.168.1.1), 30 hops max, 65000 byte packets
 1  192.168.1.1 (192.168.1.1)  112.788 ms F=1420  112.901 ms  112.854 ms
This investigation was a rewarding one and even though it took me nearly 3-4 hours to find all the components that were in the path from my laptop to the VPS, it was completely worth it to understand one of the fundamental systems that makes the Internet work: Path MTU detection.
Further research
- PMTUD (Path MTU Detection) is a very important protocol. ICMP messages of the type
Destination
  Not Reachable
should not be dropped. There are some RFCs with solutions to the problem of over blocking of ICMP packets. I am not sure how much they have been adopted though. Perhaps the confusion among administrators who think that all of ICMP is bad is that ICMP is also used for Ping and can be used to detect the IP addresses that have any sort of running host. - TCP has its own variable Maximum Segment Size (MSS) which is decided during the TCP handshake. We
can use
iptables(yay!) to ensure that TCP’s MSS is clamped to the value of MTU. tracepath --mtu $destinationcan be used to find the actual MTU that is detected between any two hosts. This works only if PMTUD is supported by all the hops along the path from the source to the destination. I don’t know what the decided MTU is if PMTUD just fails.
-
Really Simple Syndication ↩
-
Virtual Private Server ↩
-
Internet Control Message Protocol ↩
-
I restarted the Miniflux container with
LOG_LEVEL=debugto see access logs. ↩ -
Of course, I am joking. These two lines add rules to the
nattable’sPREROUTINGandPOSTROUTINGchain. ThePREROUTINGchain rule looks for TCP packets with the destination port set to some required value$DB_PORT. If the packet matches this rule, then we “jump” (-j) to theDNATchain. This is a virtual state which does what we want: “It specifies that the destination address of the packet should be modified (and all future packets in this connection will also be mangled), and rules should cease being examined. It takes one type of option: –to-destination ipaddr[-ipaddr][:port-port] which can specify a single new destination IP address” (man:iptables(8)). The second rule is self-explanatory. (Again, I am joking.) ↩ -
It is slightly funny to me that I was complaining about the complexity introduced by usage of
iptableswhen I use Istio on a weekly basis at work. (Istio is a long wild river: how to navigate it safely - IstioCon 2021 is a talk from a coworker in the Platform team.) ↩ -
Point to Point Protocol over Ethernet ↩
-
Wireguard publishes the size of their headers here; but this assumes that a packet has only the IPv4 or the IPv6 address. ↩